# cy-ml webpack配置理解
# 1.path.resolve()和path.join()
# 1) path.resolve([arg1,arg2,...])
——相当于:
cd arg1
cd arg2
2
3
- 参数最前面不带/: 相当于拼接
path.resolve('foo', 'bar', 'baz');
/foo/bar/baz
path.resolve('foo', 'bar', 'baz/asdf', 'quux');// 注意此/没有在某个参数的最前面
/foo/bar/baz/asdf/quux
path.resolve('foo', 'bar', 'baz/asdf', 'quux', '..');//这种方式可以理解先到quux了,然后又cd ..向上一个目录
/foo/bar/baz/asdf
2
3
4
5
6
- 参数最前面带/:从/就此留取后面的 (此处有疑问?————这样做的意义何在呢?)
path.resolve('path1','/path2','path3/path4')
/path2/path3/path4
path.resolve('path1','/path2','path3')
/path2/path3
path.resolve('/path1','/path2')
/path2
path.resolve('foo', 'bar', '/baz/asdf', 'quux', '..')
/baz/asdf
2
3
4
5
6
7
8
- 无参数
path.resolve()或者paht.resolve('')
相当于__dirname,当前目录
2
- 参数前面为./
path.resolve('./a')
/Users/tlm/Documents/web-front/a
path.resolve('a', 'b','./c')
/Users/tlm/Documents/web-front/a/b/c
path.resolve('./a', './b');
/Users/tlm/Documents/web-front/a/b
path.resolve('./a', '/b','./c')
/b/c
2
3
4
5
6
7
8
# 2) path.join只是简单的将该路径片段进行拼接
path.join('path1','/path2','path3/path4')
path1/path2/path3/path4
path.join('foo', 'bar', '/baz/asdf', 'quux', '..')
foo/bar/baz/asdf
path.join()
.
2
3
4
5
6
# 2. resolve
这些选项能设置模块如何被解析。webpack 提供合理的默认值,但是还是可能会修改一些解析的细节;
webpack中文文档-resolve (opens new window)
例如,当在 ES2015 中调用 import "lodash",resolve 选项能够对 webpack 查找 "lodash" 的方式去做修改;
# alias
创建import或者require的别名。比如可以对一些长路径进行简称;
alias: {
    demoStyle: path.resolve(__dirname, `../node_modules/component-demo-style-fe-ml/dist/demo.css`),
}
2
3
tlm时刻: 就是将一些在引用时需要写很长的路径,在此统一处立用一个简单的名字代替,比如vue-cli中就将src路径重名为了@。
# extensions
就是引入的路径的要去寻找的后缀。这样引入时就可以不用写后缀了。
extensions: [".js", ".json"]
# modules
告诉 webpack 解析模块时应该搜索的目录。
// 如果你想要添加一个目录到模块搜索目录,此目录优先于 node_modules/ 搜索
modules: [path.resolve(__dirname, '../src'), 'node_modules'],
2
# 3.ExtractTextWebpackPlugin插件
使用原因: webpack在打包资源的时候,会将资源文件转换成javascript代码,来实现与其他模块的合并。在打包css文件时,用JS代码引入样式的方式,会有一定的延时,且css被打包到了js文件中,以字符串的形式存在,并且整个index.bundle.js比平常大了不少;
ExtractTextWebpackPlugin插件为了抽离css样式,防止将样式打包在js中引起页面样式加载错乱的现象
使用效果: 此插件可以在打包后生成分离的js和css。此时需要将css引入到html中,此时则搭配HtmlWebpackPlugin插件就可以直接插入index.html中了。
常用代码:
const ExtractTextPlugin = require('extract-text-webpack-plugin');
module: {
	rules: [
  		{
	    test: /\.css$/,
	    use: ExtractTextPlugin.extract({
	      fallback: "style-loader",
	      use: "css-loader"
	    })
	  }
	]
},
plugins: [
	new ExtractTextPlugin("styles.css"),
]
2
3
4
5
6
7
8
9
10
11
12
13
14
15
- use:指需要什么样的loader去编译文件,这里由于源文件是.css所以选择css-loader
- fallback:编译后用什么loader来提取css文件
- publicfile:用来覆盖项目路径,生成该css文件的文件路径
参考:
使用ExtractTextPlugin插件抽取样式 (opens new window)
webpack配置中的ExtractTextPlugin插件认识 (opens new window)
# 4.HtmlWebpackPlugin
作用: 为html文件中引入的外部资源如script、link动态添加每次compile后的hash,防止引用缓存的外部文件问题
可以生成创建html入口文件,比如单页面可以生成一个html文件入口,配置N个html-webpack-plugin可以生成N个页面入口;
直白点————这个插件的作用就是可以将js或者css插入到html中;
 plugins: [
    new htmlWebpackPlugin({
        filename: 'index.html',//输出文件
        template: 'index.html',//源模板文件
        inject: 'head',// 默认为true和body同意,都是插入到body最下面。false是不插入,head插入到head中
        favicon: 'path/to/my_favicon.ico',//生成link rel="shortcut icon" href="example.ico">,
        hash:false,//默认false,true表示所有注入的静态资源添加webpack每次编译产生的唯一hash值
        minify:{removeAttributeQuotes: true},// 对html文件进行压缩,默认为false
        cache: true,//默认是true的,表示内容变化的时候生成一个新的文件。
        chunks:['index','main'],//针对多入口文件,多个打包后生成的文件引入选择
        excludeChunks:['index'], // chunks的相反的
    })
]
2
3
4
5
6
7
8
9
10
11
12
13
14
不配置任何参数时:
plugins: [
    new HtmlWebpackPlugin()
]
2
3
默认将webpack中的entry配置所有入口thunk和extract-text-webpack-plugin抽取的css样式都插入到文件指定的位置 ---即js插入body最后面,css插入head中
参考:
插件 html-webpack-plugin 的详解 (opens new window)
html-webpack-plugin详解 (opens new window)
# 5. copy-webpack-plugin插件
new CopyWebpackPlugin([{
    from: './src/demo/images',
    to: '../dark/images',
    force: true //强制覆盖先前的插件           可选 默认false
},{
    from: './src/demo/images',
    to: '../default/images',
    force: true
}]),
2
3
4
5
6
7
8
9
- from 定义要拷贝的源目录 from: __dirname + ‘/src/public’
- to 定义要拷贝到的目标目录 from: __dirname + ‘/dist’
- toType file 或者 dir 可选,默认是文件
- force 强制覆盖先前的插件 可选 默认false
- context 可选 默认base context可用specific context
- flatten 只拷贝文件不管文件夹 默认是false
- ignore 忽略拷贝指定的文件 可以用模糊匹配
根据查看很多例子,似乎是对静态资源的复制。而未实际使用还是不太能理解为何要进行复制?
CSDN上X01式动力装甲 (opens new window)如此描述:
copy-webpack-plugin 一个非常有用的插件。可以把资源文件直接拷贝到指定文件夹。特别是和webpack-dev-server配合使用。 在开发过程中进程用到纹理等资源文件。在热更新中使用require方式打包到js文件中才可以预览。 直接使用loader的方式不会被webpack解析,所以找不到资源文件。只有在编译之后把文件放到正确的路径下才开可以看到,通常是在server模式下开发,所以一直以为不能加载。是因为从来没有编译过,并把资源文件也拷贝过去。 使用copy-webpack-plugin插件后就会自动拷贝,在server 热更新模式下也会加载到浏览器中。 编译后文件在输出路径,如果需要打包成静态文件,不需要localhost就而已打开,则改成require方式。
博客圆中webpack 常用插件及作用 (opens new window)如此描述: copy-webpack-plugin :复制文件到目标文件夹。在开发时使用热模替换,(没有生成dist 文件夹,都在内存中),如果想引用某一个js文件,直接写script标签是找不到的,因为服务器内存中没有这个文件。所以复制这个文件,到dist中。
此后遇到了,便可知。
# 6.插件分为webpack内置插件 和 要外部插件。
** 内置插件通过 webpack.xxx来使用 ** 外部插件要npm install来安装require
# 7.优化webpack打包
彻底解决 webpack 打包文件体积过大 (opens new window)
# 8.dll打包
这个主要就是抽离第三方不变的库,不用每次都打包一次,大大节省了时间,提升了性能
// webpack.dll.js
const path = require('path');
const webpack = require('webpack');
const webpackConfig = {
  entry: {
    vendor: ['react', 'redux', 'react-router'],
  },
  devtool: '#source-map',
  output: {
    path: path.join(__dirname, 'build'),
    filename: '[name].dll.js',
    library: '[name]_[hash]',
  },
  plugins: [
    new webpack.DllPlugin({
      path: path.join(__dirname, 'build', '[name]-manifest.json'),
      name: '[name]_[hash]',
    }),
  ],
};
2
3
4
5
6
7
8
9
10
11
12
13
14
15
16
17
18
19
20
在build时的引用:
// webpack.build.js
plugins: [
	new webpack.DllReferencePlugin({
	  context: path.join(__dirname),
	  manifest: require('./build/vendor-manifest.json'),
	}),
	new HtmlWebpackPlugin(),
	new AddAssetHtmlPlugin({
	  filepath: path.resolve(__dirname, './build/*.dll.js'),
	}),
  ],
2
3
4
5
6
7
8
9
10
11
# AddAssetHtmlPlugin
这个插件一般用于将使用dll方法打包好的vendor.dll.js等文件加入到生成的html中
add-asset-html-webpack-plugin (opens new window) Add a JavaScript or CSS asset to the HTML generated by html-webpack-plugin
# 9. HotModuleReplacementPlugin
new webpack.HotModuleReplacementPlugin()
这个热更新插件,按大家所说应该是使用之后,就只会更新变化的组件,可是我发现总是整个页面的刷新,不知道什么问题,后续再做研究。
# 10. entry
content是一个基础入口路径,绝对路径(不常用)entry:- 对象: {app:"./app.js"},{key:value},key即为chunk入口名
- 字符串:只有value时,chunk名为main
- 数组: 多个入口
动态入口:
entry: () => './demo'; 或entry: () => new Promise((resolve) => resolve(['./demo', './demo2']))
# 11. output
output: {
    filename: '[name].js',
    path: path.resolve('./', 'dist/lib'),
    publicPath: '',
    library: 'Mydemo',
    libraryTarget: 'umd'
},
externals: { jquery: 'jQuery' },
2
3
4
5
6
7
8
# library 和 libraryTarget
在封装功能块的时候很重要
libraryTarget就是控制打包出来的内容如何暴露的,也就是从入口出来的内容怎么暴露,如果是var,那就是入口返回的值就是等于这个library变量;暴露方式包括cript直接引入,cmd,amd,commonjs,es6。。。等
libraryTarget: “var”(default) output.library 会将值作为变量声明导出(当使用 script 标签时,其执行后在全局作用域可用)。
libraryTarget: “window” 当 library 加载完成,入口起点的返回值将分配给 window 对象。
window["MyLibrary"] = _entry_return_;
// 使用者将会这样调用你的 library:
window.MyLibrary.doSomething();
1
2
3libraryTarget: “assign”
libraryTarget: “this”
this的指向由使用的用户决定
this["MyLibrary"] =_entry_return_;
this.myDemo();
myDemo(); // if this is window
1
2
3libraryTarget: “global” node环境
libraryTarget: “commonjs” 当 library 加载完成,入口起点的返回值将分配给 exports 对象。这个名称也意味着模块用于 CommonJS 环境
exports["MyLibrary"] = _entry_return_;
// 使用者将会这样调用你的 library:
require("MyLibrary").doSomething();
1
2
3
4libraryTarget: “commonjs2”
module.exports = _entry_return_;

const myDemo = require("myDemo");
myDemo();
1
2
3
4libraryTarget: “amd”
define("myDemo", [], function() {
	return _entry_return_;
});

...
require(['myDemo'], function(myDemo) {
// Do something with the library...
	myDemo();
});
1
2
3
4
5
6
7
8
9libraryTarget: “umd” 这是一种可以将你的 library 能够在所有的模块定义下都可运行的方式(并且导出的完全不是模块)。它将在 CommonJS, AMD 环境下运行,或将模块导出到 global 下的变量 最终输出:
(function webpackUniversalModuleDefinition(root, factory) {
  if(typeof exports === 'object' && typeof module === 'object')
    module.exports = factory();
  else if(typeof define === 'function' && define.amd)
    define([], factory);
  else if(typeof exports === 'object')
    exports["MyLibrary"] = factory();
  else
    root["MyLibrary"] = factory();
})(this, function() {
  //这个模块会返回你的入口 chunk 所返回的
});
2
3
4
5
6
7
8
9
10
11
12
- libraryTarget: “jsonp”
# externals 配置选项提供了「从输出的 bundle 中排除依赖」的方法
也就是说webpack打包时不会把库打入bundle中,所以需要开发者在html中通过script标签引入。 不把jquery打包进入bundle中,然后就可以用之前的依赖方式。
external配置表示我们的模块中的require(‘jquery’)中的jquery来自于window.jQuery,也就是来自于全局对象jQuery,而不要单独打包到我们的入口文件的bundle中,在页面中我们通过script标签来引入!
用于避免将一些很通用的模块打包进你发布的library里,而是选择把它们声明成external的模块,在你的library被上层使用后,在最后阶段由Webpack统一把这个external的依赖模块打包进来。
tlm时刻:
就是不希望这些通用的模块,比如jquery和bootstrap等注入到打包的bundle中,因为可能不止一处会用到这些模块,如果每次都在引入jquery(import jquery from JQuery)的地方都把jquery注入,或许每个打包好的模块都有了jquery,造成了重复,占用代码体积。使用了externals了之后,就相当于在打包好后的代码中,原代码要引入jquery的地方依然使用引入全局的jquery,不是整个jquery库的注入。
参考:
- 详解webpack的out.libraryTarget属性 (opens new window)
- 【深入理解webpack】library,libraryTarget,externals的区别及作用 (opens new window)
- webpack中的externals vs libraryTarget vs library (opens new window)
- webpack组织模块的原理 - external模块 (opens new window)
# 12. devtool
webpack中文网devtool (opens new window)中讲解的非常详细。
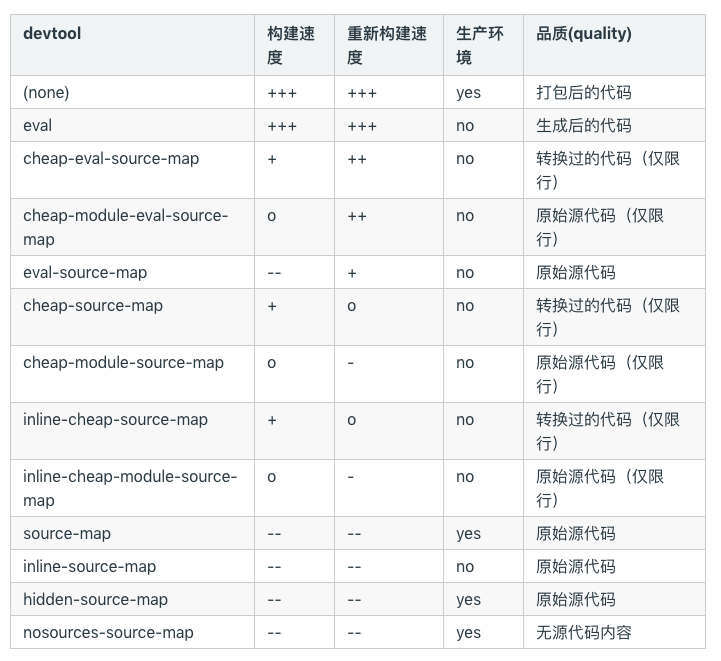 开发环境一般就用带eval的;
生产环境一般就用source-map;
特定场景(?),针对一些第三方工具:inline-source-map - source map 转换为 DataUrl(?) 后添加到 bundle 中。
tlm时刻: 在本包中开发环境就用的inline-source-map ;
# 13. cross-env
用于设置环境变量的,方便设置开发环境和生产环境
npm install cross-env -D
"scripts": {
"start": "cross-env NODE_ENV=development webpack-dev-server --config ./build/webpack.config.js",
"build": "cross-env NODE_ENV=production webpack --config ./build/webpack.config.js"
},
2
3
4
5
在node中,我们有一个对象process对象,它里面包括的一些信息,env和它的一些属性,当然NODE_ENV是我们自己加上去的自定义属性,用来区分环境变量,也就是通过这个变量来进行区别是开发环境还是生产环境;但是有个问题,不同电脑上设置的方式是不一样的(windows和linux上面就不一样),所以cross-env就来了,它可以跨平台设置环境和使用环境变量。
webpack.base.conf.js文件中修改代码:
const NODE_ENV=process.env.NODE_ENV;
console.log(NODE_ENV);
2
Webpack配置区分开发环境和生产环境 (opens new window)
# 14. devServer
const devServer = {
    contentBase: path.join(ROOT_PATH, 'dev'), // ?
    // contentBase:'dist',
    publicPath: '/',
    historyApiFallback: true, // 在开发单页应用时非常有用,它依赖于HTML5 history API,如果设置为true,所有的跳转将指向index.html
    // clientLogLevel: 'none',
    disableHostCheck: true,
    host: ip,
    port,
    open: true,
    // openPage: 'index.html',
    hot: true,
    inline: true,
    compress: true,
    stats: {
        colors: true,
        errors: true,
        warnings: true,
        modules: false,
        chunks: false
    },
    proxy: (function () {
        const obj = {}
        proxies.forEach((proxyConf) => {
            const { target, proxyPort, headers, paths } = proxyConf
            const origin = `${target}:${proxyPort}`
            paths.forEach((apiPath) => {
                obj[apiPath] = {
                    target: origin,
                    changeOrigin: true,
                    headers
                }
            })
        })

        return obj
    }())
}
2
3
4
5
6
7
8
9
10
11
12
13
14
15
16
17
18
19
20
21
22
23
24
25
26
27
28
29
30
31
32
33
34
35
36
37
38
webpack配置文件中publicPath和contentBase傻傻分不清 (opens new window)
- output的publicPath是用来给生成的静态资源路径添加前缀的;output中的publicPath影响资源生成路径;
- devServer中的publicPath是用来本地服务拦截带publicPath开头的请求的;devServer中的publicPath影响资源在本地开发环境中的访问
contentBase:
contentBase是用来指定被访问html页面所在目录的;
contentBase如果我们不配置项,devServer默认html所在的目录就是项目的根目录;
contentBase的路径是相对与webpack.config.js文件所在的目录的,有的时候,我们习惯将webpack配置文件统一放着一个build文件下,这个时候我们在写contentBase路径的时候就需要注意了
# 15.concurrently
执行多个命令
// package.json中
"scripts":{
	"watch":concurrently "npm:watch-js" "npm:watch-css" "npm:watch-node"
}
2
3
4
5
其他参考官网即可;
const path = require('path');

module.exports = {
  mode: "production", // "production" | "development" | "none"  // Chosen mode tells webpack to use its built-in optimizations accordingly.

  entry: "./app/entry", // string | object | array  // 这里应用程序开始执行
  // webpack 开始打包

  output: {
    // webpack 如何输出结果的相关选项

    path: path.resolve(__dirname, "dist"), // string
    // 所有输出文件的目标路径
    // 必须是绝对路径(使用 Node.js 的 path 模块)

    filename: "bundle.js", // string    // 「入口分块(entry chunk)」的文件名模板(出口分块?)

    publicPath: "/assets/", // string    // 输出解析文件的目录,url 相对于 HTML 页面

    library: "MyLibrary", // string,
    // 导出库(exported library)的名称

    libraryTarget: "umd", // 通用模块定义    // 导出库(exported library)的类型

    /* 高级输出配置(点击显示) */  },

  module: {
    // 关于模块配置

    rules: [
      // 模块规则(配置 loader、解析器等选项)

      {
        test: /\.jsx?$/,
        include: [
          path.resolve(__dirname, "app")
        ],
        exclude: [
          path.resolve(__dirname, "app/demo-files")
        ],
        // 这里是匹配条件,每个选项都接收一个正则表达式或字符串
        // test 和 include 具有相同的作用,都是必须匹配选项
        // exclude 是必不匹配选项(优先于 test 和 include)
        // 最佳实践:
        // - 只在 test 和 文件名匹配 中使用正则表达式
        // - 在 include 和 exclude 中使用绝对路径数组
        // - 尽量避免 exclude,更倾向于使用 include

        issuer: { test, include, exclude },
        // issuer 条件(导入源)

        enforce: "pre",
        enforce: "post",
        // 标识应用这些规则,即使规则覆盖(高级选项)

        loader: "babel-loader",
        // 应该应用的 loader,它相对上下文解析
        // 为了更清晰,`-loader` 后缀在 webpack 2 中不再是可选的
        // 查看 webpack 1 升级指南。

        options: {
          presets: ["es2015"]
        },
        // loader 的可选项
      },

      {
        test: /\.html$/,
        test: "\.html$"

        use: [
          // 应用多个 loader 和选项
          "htmllint-loader",
          {
            loader: "html-loader",
            options: {
              /* ... */
            }
          }
        ]
      },

      { oneOf: [ /* rules */ ] },
      // 只使用这些嵌套规则之一

      { rules: [ /* rules */ ] },
      // 使用所有这些嵌套规则(合并可用条件)

      { resource: { and: [ /* 条件 */ ] } },
      // 仅当所有条件都匹配时才匹配

      { resource: { or: [ /* 条件 */ ] } },
      { resource: [ /* 条件 */ ] },
      // 任意条件匹配时匹配(默认为数组)

      { resource: { not: /* 条件 */ } }
      // 条件不匹配时匹配
    ],

    /* 高级模块配置(点击展示) */  },

  resolve: {
    // 解析模块请求的选项
    // (不适用于对 loader 解析)

    modules: [
      "node_modules",
      path.resolve(__dirname, "app")
    ],
    // 用于查找模块的目录

    extensions: [".js", ".json", ".jsx", ".css"],
    // 使用的扩展名

    alias: {
      // 模块别名列表

      "module": "new-module",
      // 起别名:"module" -> "new-module" 和 "module/path/file" -> "new-module/path/file"

      "only-module$": "new-module",
      // 起别名 "only-module" -> "new-module",但不匹配 "only-module/path/file" -> "new-module/path/file"

      "module": path.resolve(__dirname, "app/third/module.js"),
      // 起别名 "module" -> "./app/third/module.js" 和 "module/file" 会导致错误
      // 模块别名相对于当前上下文导入
    },
    /* 可供选择的别名语法(点击展示) */
    /* 高级解析选项(点击展示) */  },

  performance: {
    hints: "warning", // 枚举    maxAssetSize: 200000, // 整数类型(以字节为单位)
    maxEntrypointSize: 400000, // 整数类型(以字节为单位)
    assetFilter: function(assetFilename) {
      // 提供资源文件名的断言函数
      return assetFilename.endsWith('.css') || assetFilename.endsWith('.js');
    }
  },

  devtool: "source-map", // enum  // 通过在浏览器调试工具(browser devtools)中添加元信息(meta info)增强调试
  // 牺牲了构建速度的 `source-map' 是最详细的。

  context: __dirname, // string(绝对路径!)
  // webpack 的主目录
  // entry 和 module.rules.loader 选项
  // 相对于此目录解析

  target: "web", // 枚举  // 包(bundle)应该运行的环境
  // 更改 块加载行为(chunk loading behavior) 和 可用模块(available module)

  externals: ["react", /^@angular\//],  // 不要遵循/打包这些模块,而是在运行时从环境中请求他们

  stats: "errors-only",  // 精确控制要显示的 bundle 信息

  devServer: {
    proxy: { // proxy URLs to backend development server
      '/api': 'http://localhost:3000'
    },
    contentBase: path.join(__dirname, 'public'), // boolean | string | array, static file location
    compress: true, // enable gzip compression
    historyApiFallback: true, // true for index.html upon 404, object for multiple paths
    hot: true, // hot module replacement. Depends on HotModuleReplacementPlugin
    https: false, // true for self-signed, object for cert authority
    noInfo: true, // only errors & warns on hot reload
    // ...
  },

  plugins: [
    // ...
  ],
  // 附加插件列表


  /* 高级配置(点击展示) */}
2
3
4
5
6
7
8
9
10
11
12
13
14
15
16
17
18
19
20
21
22
23
24
25
26
27
28
29
30
31
32
33
34
35
36
37
38
39
40
41
42
43
44
45
46
47
48
49
50
51
52
53
54
55
56
57
58
59
60
61
62
63
64
65
66
67
68
69
70
71
72
73
74
75
76
77
78
79
80
81
82
83
84
85
86
87
88
89
90
91
92
93
94
95
96
97
98
99
100
101
102
103
104
105
106
107
108
109
110
111
112
113
114
115
116
117
118
119
120
121
122
123
124
125
126
127
128
129
130
131
132
133
134
135
136
137
138
139
140
141
142
143
144
145
146
147
148
149
150
151
152
153
154
155
156
157
158
159
160
161
162
163
164
165
166
167
168
169
170
171
172
173
174